Last Updated: August 20, 2025
Create a Form
If you are creating forms in the eXp International HubSpot instance, please utilize the Brands drop-down menu and choose the respective Brand for your country.
- Navigate to Marketing > Forms
- In the upper right hand corner, click Create form
- Choose how to build your form
- Legacy Form Editor: Use the original form builder to create forms with familiar features.
- New Form Editor: Try the new visual editor to build forms with multiple steps, advanced styling, and more.
- Click Next

- Once the Legacy Form Editor is chosen, begin with a blank template to create a form.
- At the top of the screen, click the pencil icon to edit the form name
Refer to our naming convention document to maintain consistency in HubSpot, making it easier to search and manage assets!
Add + Edit Form Fields
To add a form field:
- In the left hand panel, use the search bar to search for existing properties, or browse through the different groups.

Not finding the property you need?
If you are operating out of the US or Canada, please contact Nicolette Kleinhampl/Emma Curtis to help.
If you are operating out of international markets, please contact Monique Commandeur to help.
- Use the drag-and-drop feature to drag and drop form fields into your form. Form fields can be placed above others, below others, and next to other fields.

Manage Your Form
- Click the form field
- In the left hand panel, edit the form options as needed.
- Basic tab: Customize your form field by making it required, hiding it from view, editing the label that appears, or adding help text and placeholder text for additional clarity.

-
- Logic tab: Configure advanced options for your form fields by adding logic. Set actions for fields that have been previously completed or dynamically display additional form fields based on responses to earlier ones.

Customize Your Form Options
From the Options tab, you can customize what happens after someone completes your form.
- What should happen after someone submits this form: Select what happens after someone submits your form.
- Thank you message: Write a personalized pop-up thank you message that each contact will get after they complete the form.
- HubSpot page or external URL: Direct contacts that have filled out the form to a HubSpot landing page for further nurturing or an external URL, which can be added through HubSpot.
- Scheduling page: Send contacts that have filled out the form to a HubSpot meetings page that will allow them to schedule a call or meeting with you for further information.
- Send submission notifications to: Select the drop-down menu to select a team or user(s) to send submission notifications to.
Please note that only HubSpot user emails are able to have form submission notifications sent to them. External HubSpot user emails cannot be used here. If you need help, please contact the HubSpot Team!
- Add to marketing campaign: All marketing assets should be linked to a marketing campaign in HubSpot to ensure accurate tracking, better performance insights, and seamless alignment across your marketing efforts.

Style + Preview Your Form
Customize Your Form’s Look and Feel with the Style & Preview Tab in HubSpot. You can adjust your form’s styling, including colors, fonts, and layout, to align with our brand.
Customize the following:
- Input options: Select one of the 4 templates provided for field and button styles.
- Style: Customize your form field's fonts, font sizes, colors, etc.
- Branding for your eXp entity will be applied automatically to the form.
Use the Preview section to preview your changes in real-time to ensure your form looks perfect before it goes live!

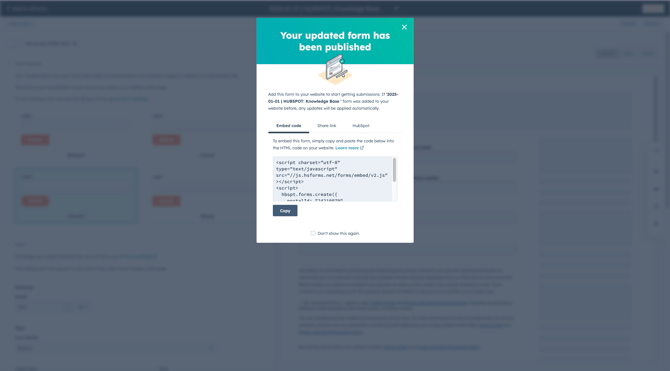
Publish Your Form
In the top right of the screen, click Update, then Publish to publish your form. Once the form has been published, an embed code and share link will populate.
- Embed code: Use the form embed code to embed the form on an external website that does not live in HubSpot.
- Share link: Use the form share link in marketing emails or HubSpot landing pages to capture contact information.
Need to duplicate an existing form? Check out our cloning forms article for a quick and easy way to save time and maintain consistency.